


How I Converted MIDI Files Into Readable Text to Display the Notes on a Piano


Summary
I walk through the process I took to make a product that could take any MIDI file and physically display the notes on a piano.
Background
This past semester at Texas A&M, in one of my classes, a teammate and I were given a Raspberry Pi, a budget, and a task. That task was to come up with a project proposal to build whatever we wanted to and we were given 6 weeks to create that product. Since we were both musicians, an idea that came to mind was to be able to download any MIDI file off the internet and, using LEDs, display the notes on a keyboard, similar to what you would find in a video like this:
In this program, Synthesia, the user create or upload MIDI files and visualize the notes approaching the keyboard. We wanted to take this concept and bring it to the physical keyboard by mapping LEDs with their corresponding notes and be able to light up the keys as the song progresses, the main task we would have to perform was converting MIDI files, that are binary files, into a version our Raspberry Pi can understand.
The Process
While I will be explaining the coding process here as well as a demo video below, I will also provide the Google Slides used in my formal presentation for the class.
So, given any MIDI file, my code was designed to perform three functions to get it ready for the keyboard. Convert, Translate, and Display
Conversion
As I stated above, if you were to simply open a MIDI file in notepad to attempt to read it, you may see some hieroglyphics like this:
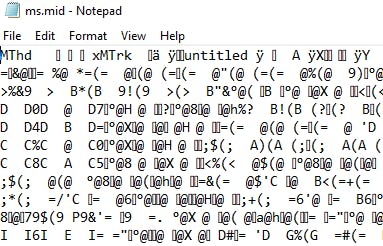
Because MIDI files are Binary Files, we need to convert the file into a readable text that we can then feed to the piano. While this process is very easy with the right tools, the output can be very difficult to understand.
MIDO Library
In Python, there is a library called MIDO that helps us with MIDI conversion, and while the conversion itself is very easy, understanding what gets returned to you requires some context. And I would know considering it took me a few hours of research and about two Monster Energy Drinks to fully wrap my head around it.
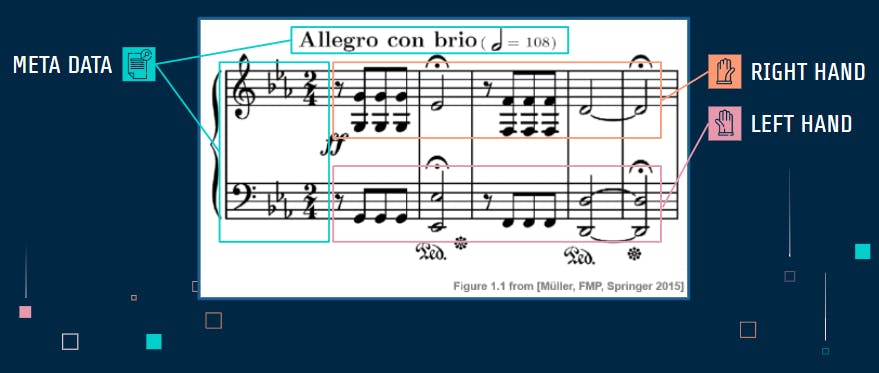
So to start, it's important to know that MIDI files are composed of three tracks (labeled 0, 1, and 2) each containing data relating to the song.
MIDI Tracks
| Track 0 | Track 1 | Track 2 |
| Meta Data | Right Hand | Left Hand |
| Song Title, Tempo, Time Signature, and Key | Instrument Type, Note, Volume, and Time | Same as Track 1 but for the Left Hand |
I also created this graphic to help demonstrate each track using piano sheet music
Now that we have that information, deciphering the data should be a bit easier. So using the MIDO Library, we can enter this code in Python
import mido
from mido import MidiFile

mid = MidiFile('midiFile.mid')
to set the newly converted data to the "mid" variable, and now we can access the individual tracks and begin to pick apart this file. By entering
print(mid.tracks[0])
You would get lines like this returned to you:
MetaMessage('track_name', name='untitled', time=0)MetaMessage('time_signature', numerator=4, denominator=4, clocks_per_tick=24, notated=8, time=0)MetaMessage('set_tempo', tempo=1200000, time=0)MetaMessage('set_tempo', tempo=1276596, time=1680)
And with that you now have meta data pertaining to the music, however, for our project, we only needed tempo. Now to get the actual notes, you could enter lines like
print(mid.tracks[1])
print(mid.tracks[2])
and through that, this is what would return:
Message('note_on', channel=0, note=61, velocity=27, time=10)Message('note_on', channel=0, note=64, velocity=27, time=38)Message('note_on', channel=0, note=61, velocity=0, time=3)Message('note_on', channel=0, note=61, velocity=0, time=37)
Channel refers to the instrument being used, but that will never apply to the project, so we use note, velocity, and time. To quickly sum these values up:
- Note: Each MIDI note has an ID attached to it ranging from 21 (lowest) to 108 (highest)
- Velocity: A value displaying the volume at which the note is played
- Time: Time between notes in Delta Time (The time between the current note and the note before it in ticks)
And with that, we now have all we need. Now we just have to make our Raspberry Pi understand what to do with this information.
Translation
The three translations that need to be made involve converting MIDI note ID to Neopixel index (our LED bulbs), Velocity to a Boolean Value (on or off), and Delta Time from ticks to seconds.
Note Conversion
This conversion was simple for us as our LEDs started at the top of the piano at index 0 and ended at the bottom at index 87, so to convert MIDI ID, we just used the formula Neo = 108 - MIDI.
Velocity Conversion
This was also a simple conversion as we would set the velocity to true if it had any value other than 0 because our LEDs only show what note is being played and doesn't take volume into consideration.
Time Conversion
This is where things heat up a little bit. In order to convert seconds into ticks, we needed three things.
- Tempo: Can be found in track[0] and are measured in microseconds per beat
- Beats per tick: Can be found using the inverse of the function
mid.tracks_per_beat - Seconds per Microsecond: 1/1000000
Now putting these all together, microseconds, ticks, and beats all cancel out, leaving seconds behind.
Note: We also added a quality of life feature that allowed the user to enter a speed multiplier if they wanted to practice at a slower pace and this multiplier would be applied to the Delta Time
Combining track[1] and track[2]
On the topic of time, an issue we encountered was that the track for the left and right hand used individual delta times, which would lead to issues in syncing. So their times had to be adjusted. We created a function that could merge the two together. The following image will demonstrate the method we used to work around this.
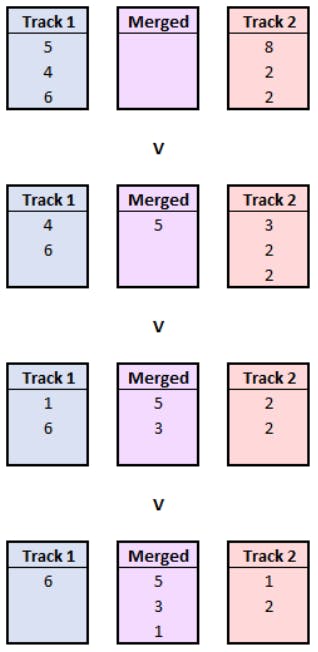
As you can see here, the function compares the two delta times and acts based on these cases:
- track[1] has a smaller delay, therefore appending that note and changing track[2]'s delay accordingly.
- track[1] has a larger delay, performing the opposite action.
- Both tracks have the same delay, adding both to the new list and setting the second one's delay to 0 so there is no delay between the notes
Note: While we merge the two tracks, we still want to remember which track each note belongs to so that on the piano, we can color coordinate notes to be played by the left hand and the right hand.
Display
Controlling the LEDs
Now, once every note is compiled into a list, we send the list through a loop, turning LEDs on and off until the list runs out, therefore reaching the end of the song. Each element in the list would contain [Delay, ID, On/Off, Track] and would run through a function that would look vaguely like psuedocode:
for inst in instructions:

    sleep(inst[delay])

    if inst[velocity]:
        turn on LED inst[ID] with inst[track] color
    else:
        Turn off LED inst[ID]
BONUS!
If you noticed these lines back in the track[0] information:
MetaMessage('set_tempo', tempo=1200000, time=0)MetaMessage('set_tempo', tempo=1276596, time=1680)
then you have a good eye! This is a very small snippet of what a song can have because these are tempo changes! Just about every song will have them so it's very important that we included this functionality in our lights! An easy workaround we did was included these tempo changes with the rest of the notes using that same merge function I discussed earlier.
Whenever the loop encountered a tempo change, it would just create another time multiplier by comparing the new tempo with the original tempo. In this case above, the multiplier in the tempo change would be 0.94 as the delay time will now be 0.94 times shorter.
The Results
If you've stuck with me this far, thank you! I've loved this project and getting to be able to share the process. I look forward to tackling more projects that I have creative control over because I am very passionate about them! This has also been my very first blog post but I do want to write a few more posts in the upcoming days regarding other projects I have completed in the past as well as the website I am currently building right now. Thank you for reading!
Demo:
Repository Link:
Where you can find me!
Website: people.tamu.edu/~ntevans8
LinkedIn: linkedin.com/in/nicholas-evans-66260b204
GitHub: github.com/ntevans